I picked up this table for free one day off of Facebook Marketplace. I am not sure why I wanted it. I think I was just in a free furniture frenzy and was getting as many different pieces as I could.

I definitely was not sure what I was going to do with it. It is very old fashioned (but at least very sturdy) and was not an attractive piece. I couldn’t even say it had good bones, but something in me kept it around just waiting for the right inspiration. I found it with the Pinterest pin I have included on the left.
First, I had to deal with the issues. There was paint drip marks on the legs due to an earlier poor paint job.

It was also too tall since it was meant to be a side table (21″ tall) instead of being ottoman height (16″ tall).
Supplies
- White chalk paint
- Miniwax Polycrylic clear sealer in high gloss
- Fabric (1.5 yards of 54″ decorator fabric)
- 3 inch foam pad
- Buttons that can be covered with fabric
- Upholstery tufting needle
- Large buttons (for the bottom of the table)
- Upholstery Twine
- Nail trim
- Spray Adhesive
- Drill / Saw
Prep
After a good cleaning, I removed the legs and decided I wanted this ottoman to be 16″ tall. The legs on the table started about 1 inch from the tabletop and then I had 3 inches of foam to attach, so I measured and marked a line on the legs at 12 inches from the top of the legs. This is where I was going to cut the bottom of the legs to shorten my table.

I also sanded down all of the paint drips so they were smooth so when I painted, it would not show.
Paint

I painted the shorter legs with plain white chalk paint. This was to freshen it up and match the fabric top better. After I painted it with two coats I added a three coats of Polycrylic sealer. Once it was all dry, I attached the legs back on the table.
Fabric/Foam Top
Since I wanted a tufted look on the top, I had to do a little bit of prep work for that. First, I had to mark where I wanted the tufts to be. For the tufted area, I measured it at 20.5″ x 16.5″ (this gave a border around the top that wasn’t tufted). Since I wanted a diamond tufted pattern, I measured out a grid on the top (for a diamond tuft, you want an even number of squares on both sides so you have an odd number of tufted rows – the lines in the photo below) – it gives some symmetry to the tufts). In my case, the holes were 4″ between columns and 5″ between rows. I measured and drew out the button spots (each row was offset from the one on top and underneath) directly on the top of the table and drilled holes all the way through the top.

I then cut out the 3 inch foam I was using to match the top of the table. This was fairly easy, I placed the foam on a table and the turned the tabletop upside-down and traced around it. I then used an electric knife to cut the foam. Once it was cut, I attached the foam to the tabletop with some spray adhesive.
I also covered it with a layer of thick fleece (could have used batting too, but I had fleece on hand) and then covered that with my fabric. I made sure to have lots of excess fabric around the table (about a 6 inch beyond where I was going to attached the nail trim on each side) to give me some play with the fabric.
Buttons
Since I wanted my buttons to match my fabric I used my button cover kit. These buttons are 1.25″ diameter buttons with a wire hook bottom. The kit came with the tools to get it all attached. I just followed the instructions and in about 15 minutes, I had the 13 buttons I needed.

Tufting
Then I started the tufting process. I had a mattress button tufter needle (12″ length) that I bought for under $10. This is the best needed to have for tufting. All I needed to do, is stick the needle through the hole drilled in bottom of the table and push up through the foam and fabric.
I cut about 18″ of twine, fed it through the wire hook on the button and then both ends through eye on the needle. Then I just pulled it through the bottom, make sure both ends of the twine were through the bottom, and removed the needle.

To secure the tufted button, I placed a large button underneath and fed the two ends of twine through them. Then had help pushing the tufted button downward on the top as I tied the twine on the bottom.

Here is one row of the tufts completed:

Finishing
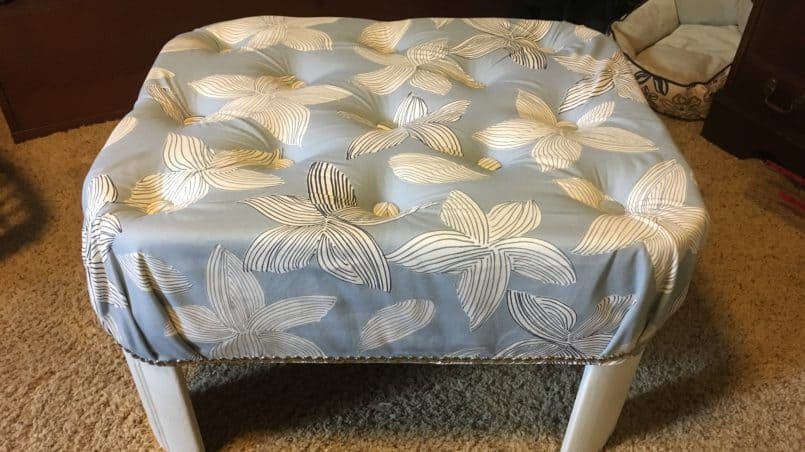
Once I had all 13 tufts in place, it was time to finish the ottoman. Since my table top didn’t hangover the legs, I opted for a nail trim to secure the fabric to the table. The one I bought comes in a roll and has a nail hole in every 5th circle. It looks like it is individual nails, but it is much faster to put on. I started in the middle of one edge since that is much easier than starting in the corners. Since I was nailing this in myself without an extra pair of hands, I used needle nose pliers to hold the nail straight and push the trim down with one hand and then hammered them in with the other.

For the corners which are always hard, I cut out some of the bulk underneath and created pleats until it was even on both sides.

Here is the finished piece. This is such a difference from the old ugly table that I had before. It has become on of my favorite projects so far.


