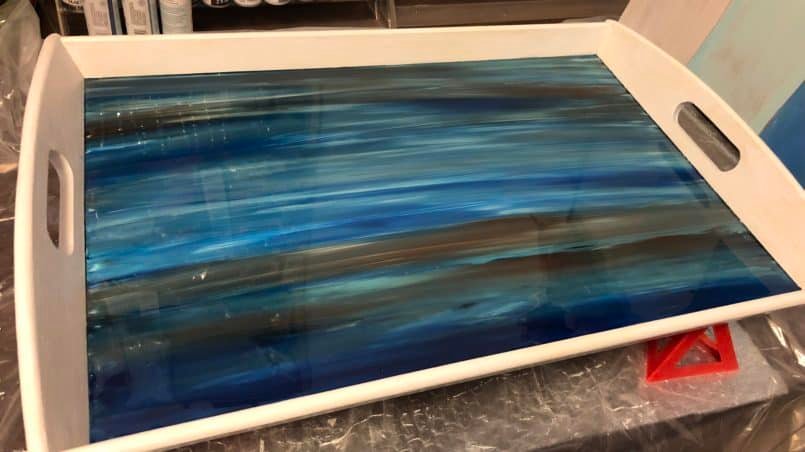
I found this tray on Facebook Marketplace for sale for $5. It looked pretty much brand new and was your average basic breakfast tray, but I wanted to transform it into something unique. This type of tray was perfect since you could unscrew one of the sides and slide out the bottom tray part. It made it much easier to stain (using the fun water-based stains called Unicorn Spit) the bottom part of the tray separately and paint the sides without worrying about taping and such.

I decided to use the water-based non-toxic stains Unicorn Spit on the bottom (brown, white, blue and teal for a beachy/water feel, and I just love this color combination) to transform this tray.

Once I removed the bottom from the tray and cleaned it well, I dotted the Unicorn Spit all over the tray by varying the colors. I didn’t sand or paint the bottom first since I wanted the smooth surface for the effect I was planning on doing with the stain. Once I felt like I had good coverage, I just used my hand to spread the stain (this stain is safe to touch since it is water-based and non-toxic) and kept smoothing over and over to give it a very soft/blended feel. If there were any holes in the coverage, I just added some more stain to that spot and blended it in.

Once I felt like I got the look that I wanted, I let it dry and focused on the sides. Don’t worry about it being perfect – it is supposed to be a bit rustic looking.

I used chalk paint in the color White Linen to paint the sides with several coats. After I was happy with the coverage, I sealed the sides with Polycrylic (water-based sealer).

For the bottom, my plan it to cover this with epoxy resin, but I wanted to put a sealant on it first. When I brushed on polyurethane, some of the colored stain came off since it was such a smooth surface so I wanted to try something different. I added more stain to the bottom to cover it up the rubbed off stain, and after that part dried, I sprayed clear lacquer on it this time (make sure you do this outside). Sealant really makes the colors pop (this stain will initially dry lighter and chalkier looking, but the sealant will bring the colors back out), and I wanted to protect it some from the epoxy coating step.

After everything was dry and sealed, I put it all back together (slid in the bottom part to the sides and screwed the side back in) and mixed and poured the epoxy resin. I like to use the 1:1 epoxy resin/low odor for these type of projects – it is easier to work with and no difficult measuring is needed. For this project I used Envirotex Lite Pour-on in the 8oz side (purchased from Amazon). This was the perfect amount for covering the tray base.

You want to make sure the epoxy is very well mixed, and the room that you are mixing is warm. If the room temperature is cold, I have taken the bottles and run them under hot water in the sink for a minute before I open them and mix. This step works well for cold temperatures. Once I poured the mixed epoxy resin in the tray, I used a tongue depressor to spread the liquid evenly around the tray.
During the mixing process and pouring, you will see a lot of air bubbles in the epoxy resin. I have found a heat gun is the best at getting rid of them. Just run the heat gun over the resin as soon as you are done pouring and the bubbles will just disappear.

You need to allow the epoxy resin to dry (according to the product’s instructions), but usually it is about 24 hours.


